Monday, September 22, 2014

Soaked Oatmeal

Old Fashioned Soaked Oatmeal or Grain Porridge

 From Nourishing Traditions and The Nourishing Cook

Yield

  • About 2 cups of oatmeal is 4 servings, or 2-3 servings if cooking for big eaters.
  • [I like to use less than half the water and salt.]

  • 1 cup oats, rolled or cracked (NOT the quick cooking kind, but ‘old fashioned’)
  • 1 cup warm water
  • 2 T whey, plain whole milk yogurt, kefir or buttermilk  (or lemon juice to make this casein free or kosher)
  • 1 cup water
  • ½ tsp sea salt
Mix the oats with warm water and whey or yogurt, cover and leave in a warm place (NOT the fridge) for at least 7 hours and as long as 24 hours [overnight is fine]. In the morning, bring an additional cup of water to a boil with the sea salt. Add the soaked oats, reduce the heat, cover and simmer several minutes. Remove from heat, stir in optional flax seeds and let stand for a few minutes. Serve with the ghee, butter or cream and rapadura or grade B maple syrup, or raw honey.

Slow Cooker Cilantro Lime (Brown) Rice


serves 6 

Half of a yellow onion, chopped
2 garlic cloves, minced
3 cups water
1 1/2 cups brown rice
1 T chicken bouillon (if using Shirley J, use half this much)
1 cup chopped cilantro
1 tsp cumin
1 can diced green chiles (I used mild)
1/2 T lime juice
1/4 tsp salt

Add all the ingredients except the cilantro to the slow cooker and stir. After it is combined, cover and cook on HIGH for about 3 hours, or until the water is all absorbed and the rice is soft and fluffy. Stir in the cilantro and serve.

http://www.365daysofcrockpot.com/2010/06/slow-cooker-cilantro-lime-brown-rice.html

Chewy Chocolate Cookies

I got this recipe from a friend after she gave me some!


Copied from google books

Sunday, September 21, 2014

Easy Make Ahead Chard Egg Casserole


Company Eggs 

bonapetit.com provided this simple make ahead dish when I had a need for some way to use my huge chard bunch!
  • 2 tablespoons olive oil
  • 1 small onion, thinly sliced [1 t. powder)]
  • 4 garlic cloves, finely chopped  [2 tsp. minced ]
  • Kosher salt, freshly ground pepper
  • 2 bunches Swiss chard, thick center ribs and stems removed, leaves coarsely chopped (about 12 cups) [forgot to measure my bunches]
  • 1/2 cup heavy cream [(had half and half)]
  • 12 large eggs
  • 2 ounces sharp white cheddar, grated (about 1/2 cup) 

    • DO AHEAD: The chard and cream mixture can be made 1 day ahead. Cover and chill. Reheat before transferring to baking dish.
    Preheat oven to 400°. Heat oil in a large skillet over medium heat. Add onion and garlic; season with salt and pepper. Cook, stirring occasionally, until onion is softened, 8-10 minutes.
  • Add chard to skillet by the handful, tossing to wilt between additions. Cook, tossing often, until tender, 8-10 minutes. Add cream and simmer until thickened and almost evaporated, 8-10 minutes; season with salt and pepper.
  • Spread chard mixture evenly in a 13x9x2-inch baking dish. Using the back of a spoon, make 12 small, evenly spaced divots in the chard mixture. Crack 1 egg into each divot. Season eggs with salt and pepper. Sprinkle cheese over.
  • Bake, rotating dish once, until egg whites are almost set and yolks are still runny, 15-18 minutes. Let stand 5 minutes before serving.

Friday, September 19, 2014

Moldy Textiles

from howstuffworks.com

Pretreat:

Mix the bleach with water and spray it on the affected areas until it's soaked through.
Sodium borate, more commonly known as Borax, or other spray stain removers can also be used for pre-treatment.
 If you're not into chemicals at all, then try soaking the clothes in a solution of cold water and one cup of white vinegar.
Once you've pre-treated the clothing, you need to wash and dry them at least two times. Hot water is best for killing mold spores, so if you have a sanitize setting on your washer, then use it.

 The same things you used for pre-treatment can also be added to your wash, so if you want to throw in some bleach or white vinegar, feel free. After one complete wash and dry, check the affected areas with your eyes and nose.

Thursday, September 18, 2014

Stephanie Fast:Adoption and Childhood Trauma

STEPHANIE FAST
I recently heard Focus on the Family's broadcast of the testimony of Stephanie Fast.   This was one of the most touching adoption stories I have heard, and how an adult deals with childhood trauma.  Check more out here:
http://ambassadorspeakers.com/ACP/speakers.aspx?name=STEPHANIE%20FAST&speaker=1460


Wednesday, September 17, 2014

Enchilada Formula and ATK Recipe

So basically, my enchiladas are 12  tortillas with 1/3 filling of 3 c. meat/beans, 2 c. cheese, 1/2 c. sauce, and chilis&cilantro mixture in each, with 1 c. sauce and 1 c. cheese on top.  This saves me the trouble of frying bland tortillas.


Essentials: Easy Enchilada

http://www.seriouseats.com/recipes/2008/03/essentials-easy-enchiladas-recipe.html

Ingredients

  • 3 cups shredded cooked chicken (1 1/2 pounds) (used gr. beef)
  • 12 ounces sharp cheddar cheese, shredded (3 cups)
  • 1 1/2 cup enchilada sauce (canned or homemade--recipe below)
  • 1 to 2 (4-ounce) cans chopped green chiles, drained
  • 1/2 cup minced fresh cilantro
  • Salt and pepper
  • 12 (6-inch) corn tortillas
  • Lime wedges, sour cream, diced avocado, tomatoes, and shredded lettuce for serving, optional (I would not eat any of these things with enchiladas!)

Procedures

  1. Heat oven to 400°F with a rack in the middle. Combine the chicken, 2 cups of the cheese, 1/2 cup of the enchilada sauce, the chiles, and cilantro. Season with salt and pepper to taste.

    2Warm tortillas.

    3 Lightly grease a 9x13 inch dish. . Spread 1/3 cup filling evenly down the center of each tortilla. Tightly roll the tortilla around the filling and lay seam-side down in the baking dish.

    4 Lightly spray the enchiladas with vegetable oil spray (opt.). Pour the remaining 1 cup of enchilada sauce  so that they are thoroughly coated. Sprinkle the remaining 1 cup cheese. Cover with foil and bake until  enchiladas are heated through, 20-25 minutes.

    5 Remove the foil and bake until the cheddar browns, about 5 minutes more.

    Fast Enchilada Sauce

    • 1 tablespoon vegetable oil
    • 1 onion, minced
    • 1/2 teaspoon salt
    • 3 tablespoons chili powder
    • 3 garlic cloves, minced
    • 2 teaspoons cumin
    • 2 teaspoons sugar [(1 t. honey)]
    • 2 (8-ounce) cans tomato sauce
    • 1/2 cup water


    makes 2 1/2 cups. Adapted from The America's Test Kitchen Family Cookbook
    Heat the oil in a 12-inch skillet over medium heat until shimmering. Cook the onion and salt until softened, about 5 minutes. Stir in chili powder, garlic, cumin, and sugar. Cook until fragrant, about 15 seconds. Stir in the sauce and water. Simmer until slightly thickened, about 5 minutes. Salt and pepper to taste.


Monday, September 15, 2014

Pumpkin Apple Streusel Muffins

Pumpkin Apple Streusel Muffins

I'm subbing this apple streusel/ crisp topping, copied below.


Dry ingredients:
  • 1 cup almond flour*
  • 1/3 cup coconut flour
  • 1/4 cup ground flaxseed*
  • 1 tsp baking soda
  • 1 tbsp cinnamon
  • 1/4 tsp ginger
  • 1/4 tsp nutmeg
  • 1/4 tsp. salt
Wet ingredients:
  • 3 eggs
  • 1 cup pumpkin puree
  • 3/4 cup honey*
  • 1/4 cup coconut oil, melted*
  • 1 cup chopped apples (about 2 small)
Optional streusel topping (make this before batter!):
  • 3/4 cup ground sunflower seeds*
  • 3 tbsp coconut flour
  • 1 tsp cinnamon
  • 1/8 tsp salt
  • 1/4 cup honey*
  • 3 tbsp coconut oil, melted*
Instructions for muffin mix jar:
Combine all of the dry ingredients into container. (If you want to include the streusel, mix up the dry ingredients of that in a separate bowl, put in baggie, and place in the jar/container before closing).

Directions for mix:
  1. Preheat oven to 350 degrees and line 18 muffin tins with paper liners (to prevent sticking you can further spray the liners with oil).
  2. In a large bowl beat the eggs and then add the pumpkin puree and honey, mixing well.
  3. Now add the dry ingredients to the wet ingredients and stir until thoroughly combined.
  4. Mix in the chopped apple chunks.
  5. Divide the batter equally among the 18 muffin tins.
  6. If making the optional streusel combine the dry ingredients with the wet ingredients (it should resemble a sticky dough). Break the dough up into little pieces and sprinkle over the muffin batter.

  7. Bake the muffins for approximately 30-40 minutes (oven times may vary). The muffins will be done when the tops spring back when slightly touched and the streusel topping is a dark golden brown.
  8. Let cool for about 10 minutes before eating.  
Alternative Apple Crisp Topping and baking instructions: I made triple to add to other yummy things... pancakes, toast, oatmeal.

  3 large finely diced, fresh, organic apples (Quadruple: 12)
 ¼ tsp ground cinnamon (1)
1/2 cup of of pecans (or other nut), finely chopped (2)
1 tbsp honey
 1/8 tsp pure vanilla extract (4)
1 tbsp butter (4)

Cook the apples coated with the cinnamon in butter on low heat until soft. Remove from heat and add honey, vanilla, and pecans; mix.
Now you’re ready to put the muffin together. Add one spoonful of the muffin batter to the muffins cups. Take your finger and spread it out in the bottom of the muffin cup (she said to tap the pan, but my batter was to sticky). Next, add a spoonful of the apple crisp mixture. Top with another spoonful of batter, flatten the batter with your finger over top of the muffin. Top with remaining apple crisp mixture.
Bake 25-30 minutes, until muffins are slightly brown around edges, knife comes out clean.

*Ingredient substitutions: You can use any kind of nut or seed flour in place of the almond flour to make this suitable for allergies. [Used]Ground chia meal would also work subbed in for the flaxseed in equal amounts. Instead of the honey maple syrup can be substituted...

Sunday, September 14, 2014

Exercises for Soreness

3 Exercises for When You're Really Freaking Sore

Great pictures and descriptions - tried just readin the descriptions, didn't get it.

Posture: More than Pretty

I loved learning more about this perpetual need in my life!   It makes you feel better in every way.  I also think the 'power postures' are fascinating: how certain posture/body language makes you feel confident.

from http://www.refinery29.com/2013/08/51619/posture

...Taking frequent breaks to notice our posture may seem like a nuisance, but Ken Baldwin, executive director of The National Posture Institute and sport and wellness professor at the State University of New York, also endorses the practice. "You need to think about your posture every 30 minutes you are awake,” he says.

Baldwin has developed a four-step re-alignment sequence that will correct posture (and elevate moods) when sitting, walking and exercising:

1. Stand or sit as tall as you possibly can. If sitting, avoid crisscrossing limbs and ensure that when your feet touch the floor, your body is forming a 90-degree angle with your torso, hips, and legs.

2. Elevate your chest. Elevate the scapula so it becomes level. Position your shoulders so the form a squared-off, 90-degree angle instead of dropping down.

3. Retract shoulder blades and pull them back. To do this, envision holding a pencil between the shoulder blades.This activates the rhomboids and middle trapezius muscle groups, which are weak and distorted in 95% of the population, according to Baldwin. Additionally, to reduce forward head protrusion, use your fingers to press on the chin and push it back, which will better align your neck (and deter lateral deviations in the spine).

4. Isometrically contract your abdominal muscles. To do so, draw the belly button inward, toward the spine, and contract the core muscles to help maintain the position you’ve achieved by following the previous steps.

Friday, September 12, 2014

Roasted Pears with Golden Raisins and Hazelnuts


ATK Roasted Pears with Golden Raisins and Hazelnuts

Serves 4 to 6

Select pears that yield slightly when pressed. We prefer Bosc pears in this recipe, but Comice and Bartlett pears also work. The fruit can be served as is or with a scoop of vanilla ice cream or a dollop of plain Greek yogurt.

Ingredients

  • 2 1/2 tablespoons unsalted butter
  • 4 ripe but firm Bosc pears (6 to 7 ounces each), peeled, halved, and cored
  • 1 (2-inch) piece ginger, sliced into 1/2-inch-thick rounds, plus 2 teaspoons grated fresh ginger
  • 1 1/4 cups dry white wine
  • 1/2 cup golden raisins
  • 1/3 cup (2 1/3 ounces) sugar
  • Pinch salt
  • 1 teaspoon lemon juice
  • 1/3 cup hazelnuts, toasted, skinned, and chopped

Instructions

1. Adjust oven rack to middle position and heat oven to 450 degrees. Melt 1½ tablespoons butter in ovensafe 12-inch skillet over medium-high heat. Place pear halves, cut side down, and ginger slices in skillet. Cook, without moving them, until pears are just beginning to brown, 3 to 5 minutes.
2. Transfer skillet to oven and roast pears for 15 minutes. Using tongs, flip pears and continue to roast until fork easily pierces fruit, 10 to 15 minutes longer (skillet handle will be hot).
3. Using tongs, transfer pears to platter and discard ginger slices. Return skillet to medium-high heat and add wine, raisins, sugar, salt, and remaining 1 tablespoon butter. Bring to vigorous simmer, whisking to scrape up any browned bits. Cook until sauce is reduced and has consistency of maple syrup, 7 to 10 minutes. Remove pan from heat and stir in lemon juice and grated ginger.
4. Pour sauce over pears, sprinkle with hazelnuts, and serve.


Shopping list for

Roasted Pears with Golden Raisins and Hazelnuts

Dairy
  • • unsalted butter
    2 1/2 tablespoons
Produce
  • • Bosc pear
    4
  • • ginger
    1 (2-inch) piece
  • • lemon juice
    1 teaspoon
Alcohol
  • • dry white wine
    1 1/4 cups
Pantry/Dry Goods
  • • golden raisin
    1/2 cup
  • • sugar
    1/3 cup (2 1/3 ounces)
  • • salt
    Pinch
  • • hazelnut
    1/3 cup

Wednesday, September 3, 2014

Make Ahead Slow-Cooker Asian Braised Beef Short Ribs

Make Ahead Slow-Cooker Asian Braised Beef Short Ribs

SFS_Slow-Cooker Korean Braised Beef Short Ribs-3997
SERVES 4 TO 6 
TO PREP 15 MINUTES 
TO COOK 9 to 10 HOURS ON LOW OR 6 to 7 HOURS ON HIGH
TO FINISH 10 MINUTES
Why This Recipe Works: For a boldly flavored, ultrasatisfying dinner, we slow-cooked short ribs until meltingly tender in an Asian-style sauce that tasted sweet, spicy, and savory all at once. The well-marbled ribs cooked down significantly, so to compensate we started with 5 pounds of ribs for four to six diners. The duo of hoisin sauce and chili-garlic sauce provided an intensely flavored sauce with a nice sweetness and subtle heat, and a small amount of chicken broth worked to thin the mixture slightly. To ensure an ultraclingy sauce by the end of the cooking time, we stirred in 1 tablespoon of tapioca. Thinly sliced scallion whites gave the sauce an aromatic presence. Once the ribs were tender, we defatted the sauce, then stirred the ribs back in and sprinkled the finished dish with scallion greens for freshness and a burst of color.
You will need a 5 1/2- to 7-quart slow cooker for this recipe. Serve with egg noodles or rice.
1/4 cup chicken broth
3/4 cup hoisin sauce
3 scallions, white parts minced, green parts sliced thin
4 teaspoons Asian chili-garlic sauce
1 tablespoon instant tapioca
5 pounds bone-in English-style short ribs, trimmed
Salt and pepper

TO PREP
1. Combine broth, hoisin, scallion whites, chili-garlic sauce, and tapioca in slow cooker. Season short ribs with salt and pepper and nestle into slow cooker.
TO COOK
2. Cover and cook until beef is tender, 9 to 10 hours on low or 6 to 7 hours on high.
TO FINISH AND SERVE
3. Transfer short ribs to serving platter, tent loosely with aluminum foil, and let rest for 5 minutes. Skim excess fat from surface of sauce. Pour sauce over short ribs and sprinkle with scallion greens. Serve.
NIGHT TIME PREP
• Scallions can be prepared; refrigerate.
• Short ribs can be trimmed and seasoned; refrigerate.

 http://makeaheadbook.com/recipes/

ATK Spice-Rubbed Flank Steak

Make Ahead Spice-Rubbed Flank Steak with Toasted Corn and Black Bean Salad

SFS_Spice_rubbed_flank_steak_toasted_corn_black_bean_salad-10
SERVES 4
TO PREP 25 MINUTES
STORE 1 to 24 HOURS
TO FINISH 30 MINUTES
Why This Recipe Works: The big beefy flavor of flank steak is well suited to the grill, but to keep this recipe convenient for a weeknight, we set out to find a method for bringing it indoors with equally flavorful results. Broiling gave us a nicely browned crust, but it overcooked the meat. Roasting allowed us to turn out a perfect medium-rare steak, but it never developed a flavorful crust. In our search for the perfect sear, we browned the steak on the stovetop, then moved it to the oven to roast. To enhance the flavor of the steak, we wanted a spice rub that developed flavor as it sat overnight; a combination of chili powder, cumin, coriander, cinnamon, and red pepper flakes added just the right amount of heat and complexity. A bright black bean and corn salad complemented the steak. To bring out its sweet flavor, we browned the corn in the skillet while the steak rested.
Be sure to use fresh corn here; canned or frozen corn will not brown well. For a spicier salad, use the larger amount of chipotle. We prefer this steak cooked to medium-rare.
1 1/2 teaspoons chili powder
1 1/2 teaspoons ground cumin
1 1/2 teaspoons packed dark brown sugar
3/4 teaspoon ground coriander
Salt and pepper
Pinch ground cinnamon
Pinch red pepper flakes
1 (1 1/2- to 2-pound) flank steak, trimmed
2 tablespoons vegetable oil
2 tablespoons lime juice
2 scallions, sliced thin
1–2 teaspoons minced canned chipotle chile in adobo sauce
1 (15-ounce) can black beans, rinsed
1 red bell pepper, stemmed, seeded, and chopped fine
1/4 cup minced fresh cilantro
3 ears corn, kernels cut from cobs

TO FINISH AND SERVE
4 teaspoons vegetable oil

TO PREP
1. Combine chili powder, cumin, sugar, coriander, 1/2 teaspoon salt, 1/2 teaspoon pepper, cinnamon, and pepper flakes. Rub steak with spice mixture; wrap tightly with plastic wrap.
2. Whisk oil, lime juice, scallions, and chipotle together in large bowl. Stir in beans, bell pepper, and cilantro; cover.
TO STORE
3. Refrigerate steak, bean mixture, and corn kernels separately for at least 1 hour or up to 24 hours.
TO FINISH AND SERVE
4. Remove black bean mixture from refrigerator and bring to room temperature while preparing steak. Adjust oven rack to middle position and heat oven to 450 degrees.
5. Pat steak dry with paper towels. Heat 1 ­tablespoon oil in 12-inch ovensafe skillet over medium-high heat until just smoking. Place steak in skillet and cook until well browned on first side, 3 to 4 minutes. Flip steak, transfer skillet to oven, and roast until steak is browned on second side and registers 125 degrees (for medium-rare), 4 to 5 minutes.
6. Carefully remove skillet from oven (skillet handle will be hot). Transfer steak to carving board, tent loosely with aluminum foil, and let rest for 5 to 10 minutes. Being careful of hot skillet handle, wipe out skillet using paper towels, then add remaining 1 teaspoon oil and heat over medium heat until shimmering. Add corn and cook, without stirring, until well browned and toasted, 5 to 7 minutes.
7. Stir toasted corn into bean mixture and season with salt and pepper to taste. Slice steak thin against grain and serve with corn and bean salad.
http://makeaheadbook.com/recipes/

Moroccan Chicken Salad

ATK Moroccan Chicken Salad with Apricots and Almonds

SFS_moroccan_chicken_salad_apricots_almonds-6
SERVES 4 TO 6 
TO PREP 1 HOUR 
STORE UP TO 2 DAYS 
TO FINISH 20 MINUTES
Why This Recipe Works: For a creative take on a fresh chicken salad, we were inspired by the flavors of Morocco—apricots, lemon, and warm spices. Instead of pulling out half the spice cabinet to flavor our dressing, we reached for garam masala, a traditional spice blend of coriander, cumin, ginger, cinnamon, and black pepper that gave the dressing complex flavor without any fuss. We fortified the dressing with a little more coriander, honey, and a pinch of smoked paprika for depth. Microwaving the spices in a little oil was a quick and easy way to bloom them, deepening their flavors for an even bolder dressing. Chickpeas further echoed the Moroccan theme and lent heartiness, and fresh, crisp romaine combined with slightly bitter watercress made the perfect bed of greens to complement our toppings. Tossing the chicken mixture with a little extra dressing refreshed the flavors before serving, and a sprinkling of toasted almonds lent the perfect crunch to the finished salad.
1 1/2 pounds boneless, skinless chicken breasts, trimmed
Salt and pepper
3/4 cup extra-virgin olive oil
1 teaspoon garam masala
1/2 teaspoon ground coriander
Pinch smoked paprika
1/4 cup lemon juice (2 lemons)
1 tablespoon honey
1 (14-ounce) can chickpeas, rinsed
1 shallot, sliced thin
3/4 cup dried apricots, chopped coarse
2 tablespoons minced fresh parsley
2 romaine lettuce hearts (12 ounces), cut into 1-inch pieces
4 ounces (4 cups) watercress
1/2 cup whole almonds, toasted and chopped coarse

TO PREP
1. Pat chicken dry with paper towels and season with salt and pepper. Heat 1 tablespoon oil in 12-inch skillet over medium-high heat until just smoking. Brown chicken well on first side, 6 to 8 minutes. Flip chicken, add 1/2 cup water, and cover. Reduce heat to medium-low and continue to cook until chicken registers 160 degrees, 5 to 7 minutes. Transfer chicken to carving board, let cool slightly, then slice 1/2 inch thick on bias. Let cool to room temperature, about 15 minutes.
2. Meanwhile, microwave 1 tablespoon oil, garam masala, coriander, and paprika in medium bowl until oil is hot and fragrant, about 30 seconds. Whisk 3 tablespoons lemon juice, honey, 1/4 teaspoon salt, and 1/4 teaspoon pepper into spice mixture. Whisking constantly, drizzle in remaining oil.
3. In large bowl, combine cooled chicken, ­chickpeas, shallot, apricots, parsley, and half of dressing and toss to coat; cover. Whisk remaining 1 tablespoon lemon juice into remaining dressing; cover.
4. Toss romaine, watercress, and almonds together in separate bowl; cover.
TO STORE
5. Refrigerate chicken mixture, dressing, and ­lettuce mixture separately for up to 2 days.
TO FINISH AND SERVE
6. Remove chicken mixture, dressing, and lettuce mixture from refrigerator and let sit at room temperature for 15 minutes. Whisk dressing to recombine, drizzle 2 tablespoons dressing over chicken mixture, and season with salt and pepper to taste. Toss lettuce mixture with remaining dressing and season with salt and pepper to taste. Transfer lettuce mixture to serving platter and top with chicken mixture. Serve.

http://makeaheadbook.com/recipes/

Chicken Fingers

Chicken Fingers

SFS_Chicken Fingers_007
MAKES 16 FINGERS 
TO PREP 1 HOUR 20 MINUTES 
STORE UP TO 1 MONTH 
TO FINISH 45 MINUTES
Why This Recipe Works: When we looked at the ingredient list on prepackaged chicken fingers, we were surprised to discover so many preservatives we couldn’t pronounce. We liked the idea of having something as simple and adaptable as chicken fingers on hand, so we wondered if we could stock our freezer with kid-friendly, great-tasting chicken fingers with minimal effort. The freezer has a drying effect on food, and lean chicken breast is no exception. We had a hunch that all those preservatives were helping to keep the chicken moist during the reheat, so we started by thinking about how to keep the chicken as moist as possible. Brining turned out to be the best solution: It makes the chicken very juicy so it doesn’t dry out as it cooks. To give our chicken fingers great flavor, we added a dash of Worcestershire sauce to the brine and onion and garlic powder to the breading. To get a crisp coating on our chicken even after reheating, we swapped traditional bread crumbs for ultracrisp panko bread crumbs and tried a few different cooking techniques. Deep-frying the chicken fingers was a lot of work for little payoff. Next, we tried to mimic frying by tossing the breading with oil and baking the chicken, but on the reheat the chicken was dry and the coating was sandy. Sautéing turned out to be the winning technique: By the time the breading fried up supercrisp and golden, the chicken was cooked through but still tender and moist, and we avoided all the mess and waste of deep frying. These chicken fingers were good enough to please kids and adults alike.
Don’t brine the chicken for longer than 30 minutes or it will be too salty.
Salt and pepper
2 tablespoons Worcestershire sauce
1 1/2 pounds boneless, skinless chicken breasts, trimmed and cut lengthwise into 3/4-inch-wide strips
1/2 cup all-purpose flour
1 tablespoon onion powder
1 teaspoon granulated garlic
3 large eggs
2 cups panko bread crumbs, toasted
3/4 cup vegetable oil

TO PREP
1. Dissolve 1 tablespoon salt and Worcestershire in 2 cups cold water in large bowl. Submerge chicken in brine, cover, and refrigerate for 30 minutes.

2. Remove chicken from brine and pat dry with paper towels. Combine flour, onion powder, granulated garlic, 1/4 teaspoon salt, and 3/4 teaspoon pepper in shallow dish. Lightly beat eggs in second shallow dish. Spread panko in third shallow dish. Working in batches, dredge chicken in flour mixture, dip in eggs, then coat with panko, pressing gently to adhere; transfer to large plate.
3. Set wire rack in rimmed baking sheet. Heat 1/4 cup oil in 12-inch nonstick skillet over medium heat until shimmering. Lay one-third of chicken in skillet and cook until golden brown, about 3 minutes per side. Transfer to prepared rack and wipe out skillet. Repeat shallow frying twice more with remaining oil and chicken. Let chicken cool to room temperature, about 30 minutes.
TO STORE
4. Transfer cooled chicken fingers to zipper-lock freezer bags, press out air, and seal. Freeze for up to 1 month. (Do not thaw before reheating.)
TO FINISH AND SERVE
5. Adjust oven rack to middle position and heat oven to 350 degrees. Place chicken fingers on wire rack set in rimmed baking sheet and bake until heated through and crisp, about 30 minutes, flipping chicken halfway through baking. Serve.
http://makeaheadbook.com/recipes/chicken-fingers/

Popular Coconut and Almond Flour Bread

Coconut Milk Bread

gluten-free, grain-free, dairy-free, Paleo
Wet Ingredients:
1 & 1/4 cups coconut milk, room temperature
4 whisked eggs, room temperature
1/4 cup melted coconut oil
1 tablespoon apple cider vinegar
1 tablespoon honey
Dry :
2 cups | 240g almond flour (I have used both Bob’s and Honeyville in this recipe)
1/2 cup | 70g coconut flour, sifted to remove any lumps
2 tbsp psyllium husk POWDER
1 teaspoon sea salt
3/4 teaspoon baking soda

Preheat the oven to 350 degrees.
1) Lay a piece of unbleached parchment paper across the bread loaf pan so that it goes down one of the long sides, across the bottom and back up the other long side.

2) Grease the two exposed glass ends of the dish. Set aside.
3) Add dry ingredients to a small mixing bowl and whisk to combine.
4) Add wet ingredients to a medium sized mixing bowl. Mix with an electric mixer.
5) Add whisked dry ingredients to wet mixed ingredients. Mix with an electric mixer.
6) Using a flexible silicone spatula, scoop half of the batter into the prepared pan, and press it down firmly.
7) Add the rest of the batter to the dish using the flexible silicone spatula, and press down firmly again. (The top should be smooth and level when you’re finished.)
8) Bake for about 70 minutes.
9) Let the bread rest in the pan until cool.

Comments I might need:

I made a couple of alterations: (1) I omitted the honey (I didn’t want to eat a sweet bread); (2) I used psyllium husks, not powder; and (3) I baked it in two mini-loaf pans, not one pan. The resultant bread is moist but not cakey.

substituting flax meal for the psyllium husk. It has the texture of a very firm and dense banana bread.

I didn’t have any phylum husk powder but I did have some organic fiber powder, I used that instead and it turned out AMAZING! Held together great, even when toasted, and remained very moist also. Slightly denser than normal bread but that also means it filled up up more too!

I added 1 tsp of turmeric to try to counteract any “purplishness” that might appear.

I was a little unnerved about what I read about psyllium husk, so I swapped it out for ground teff.

freezes well.

8 Smart Strategies for Dinner Tonight

This is from ATK:http://makeaheadbook.com/recipes/

8 Smart Strategies for Dinner Tonight

What kind of cook are you?

Do you like to cook all weekend just to stock your freezer? Do you like to prep Tuesday night’s dinner on Monday night? Will you follow a precise shopping and prep plan that yields three great weeknight dinners with a minimum of fuss? Or would you rather do a little prep in the early morning, turn on your slow cooker, and have dinner waiting for you when you hit the door? While most make-ahead cookbooks focus entirely on stocking your freezer with complete meals or meal components, this book takes a new approach. Yes, you will find a chapter devoted to dinners from the freezer, but you will also find seven other creative chapters that show you how a little advance work can reap huge benefits. Here’s a rundown of how we’ve set up the book so you can choose your style of make-ahead cooking depending on your temperament, your schedule, and your family’s needs. You pick the lane. We’ve done all the planning for you, leaving nothing to chance.

1. Prep Ahead: Ready-to-Cook Meals

Oven-ready entrées that take a minimal amount of work the night before mean a great meal with little effort the next day. With these recipes, you can prep for tomorrow’s meal while tonight’s supper cooks or spend 20 minutes getting dinner ready in the morning, then pop it straight into the oven after work. We include a wide range of recipes, from grilled beef kebabs to tandoori chicken to vegetarian stuffed acorn squash. And we found smart ways to take advantage of the hands-off resting time—marinades and spice rubs infuse many of the dishes with great flavor as they sit. We also use the built-in rest to salt or air-dry larger cuts of meat for more tender, flavorful results.
→ View Prep Ahead recipes

2. Reheat and Eat: Make-Ahead Stews and Braises

Stews and braises are some of the most ­time-intensive dishes to make because they require long, gentle cooking to tenderize tough cuts of meat and develop deeply flavored broths and sauces. But making these dishes ahead of time allows you to take advantage of the time the dish spends cooling and resting until you’re ready to reheat it. We put this time to work, using carryover cooking during the cooling process so that we could cut back on the active cooking time. We also used the overnight resting time to develop complex flavor so we could simplify our ingredient lists, saving time and effort.
→ View Reheat and Eat recipes

3. Bake and Serve: Oven-Ready Casseroles

Casseroles are surefire crowd-pleasers, but between preparing the ingredients, assembling, and baking, they can be difficult to pull off on a busy weeknight. And storing and reheating usually results in dried-out sauces, mushy vegetables and noodles, and tough, dry meat. To make versions of all of our favorite casseroles—from chicken pot pie to classic lasagna—that could be made ahead, we had to reengineer our recipes. Parcooking pasta and vegetables so they’d turn tender as the casserole baked and making loose sauces that wouldn’t overthicken in the oven were a couple of the tricks we used to keep our casseroles tasting just as good as traditional versions. And we also include fresh new classics that focus on whole grains and hearty vegetables, such as Hearty Vegetable and Orzo Casserole and Farro, White Bean, and Broccoli Rabe Gratin.
→ View Bake and Serve recipes

4. From Fridge to Table: Ready-to-Serve Entrées

Whether you’re in the mood for a healthy dinner, need something easy to bring to a potluck or picnic, or just want to avoid cranking up the oven on a hot summer night, dinners ready to serve straight from the fridge are great options to save time and energy. And you’d be surprised at the range of food that tastes great served cold—this chapter includes fried chicken, poached salmon, and chilled Asian noodle dishes along with a wide variety of fresh, inventive salads. Because cold dulls flavors, we made sure to season these dishes aggressively, to make bold dressings, and to finish the dishes with a little vinegar or lemon juice to ensure that the flavors were bright.
→ View From Fridge to Table recipes

5. Shop Smart: One Grocery Bag Makes Three Dinners

It’s the eternal question: What’s for dinner tonight? This chapter has the answer, with easy, thrifty plans that deliver three delicious weeknight dinners. For each three-day menu, we provide you with a shopping list of just 12 fresh ingredients plus a list of pantry staples you’ll need. With such short ingredient lists, these menus required that we come up with clever ways to make ingredients do double duty while still delivering a menu with lots of variety. These easy weeknight meals come together quickly—with impressive results.
→ View Shop Smart recipes

6. The Sunday Cook: Big Roasts Plus Creative Second Meals

Lazy Sundays are perfect for spending a little extra time in the kitchen pulling off a spectacular roast for a big family meal. We wanted to stretch that effort further by developing recipes using the leftovers to make a quick and easy weeknight meal. We include six roasts, each with two options for a creative meal that puts the leftovers to work. Rosy roast beef becomes beef and vegetable fajitas or a flavorful Vietnamese rice noodle soup, and leftover slow-roasted pork makes easy pork fried rice or a quick pork ragu with polenta.
→ View The Sunday Cook recipes

7. Come Home to Dinner: Easy Slow-Cooker Favorites

The massive popularity of the slow cooker is easy to understand. Thanks to its low, slow, and safe electric heat, many dishes can cook all day, so you can go to work and come home to a great-tasting hot dinner. But some slow-cooker recipes don’t live up to that promise, with dull, washed-out flavors and mushy textures. So we looked for ways to build great flavor, adding lots of aromatics and savory ingredients like soy sauce and tomato paste and finishing our dishes with fresh herbs or a squeeze of lemon juice. And we made sure to keep the prep times short (some as quick as 15 minutes) and the cooking times long (at least 8 hours) so the recipes are easy to get started on a busy morning and ready to eat when you come home.
→ View Come Home to Dinner recipes

8. Stock the Freezer: Big-Batch Suppers

There’s no better antidote to a hectic schedule than a well-stocked freezer full of delicious, homemade, ready-to-heat meals. This chapter includes crowd-pleasing casseroles like shepherd’s pie and macaroni and cheese (and each recipe makes two, so you get a big payoff for your time and effort). We also include big-batch stews, chilis, and pasta sauces plus individual items like burritos and chicken fingers that make it easy to feed any number of people. To ensure great results, we developed these recipes specifically for the freezer: For creamy freezer casseroles, we had to make the sauces looser. And to get crisp toppings for our casseroles, we used a foil shield to separate the topping from the moist filling.

This is from ATK:http://makeaheadbook.com/recipes/

ATK Beef and Broccoli Stir-Fry; Skillet Penne with Sausage, Sun-Dried Tomatoes, and Spinach; Skillet Pizza with Broccoli and Red Onion

ATK Beef and Broccoli Stir-Fry; Skillet Penne with Sausage, Sun-Dried Tomatoes, and Spinach; Skillet Pizza with Broccoli and Red Onion

One Grocery Bag Makes Three Dinners

SHOP FOR:
1 1/2 pounds flank steak
1 pound Italian sausage
8 ounces mozzarella cheese
1 1/2 pounds broccoli florets
2 carrots
6 ounces baby spinach
1 red onion
1 knob fresh ginger
1 (1-pound) package ­store-bought pizza dough
1 1/4 cups oil-packed ­sun-dried tomatoes
1/4 cup hoisin sauce
1 tablespoon sesame seeds
CHECK THE PANTRY FOR:
Parmesan cheese
Garlic (10 cloves)
Penne
Chicken broth
Soy sauce
Red pepper flakes
Vegetable oil
Extra-virgin olive oil

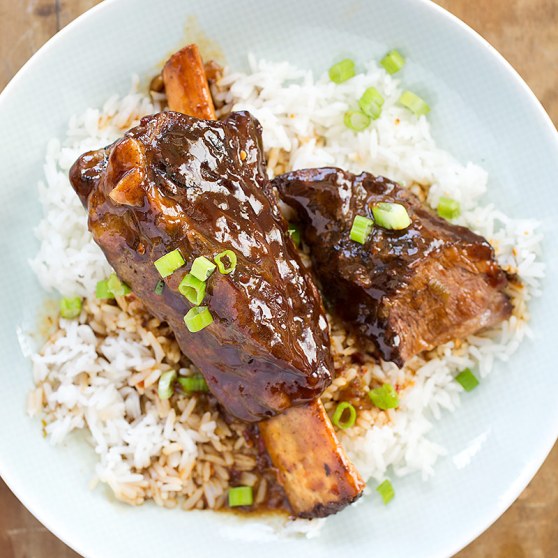
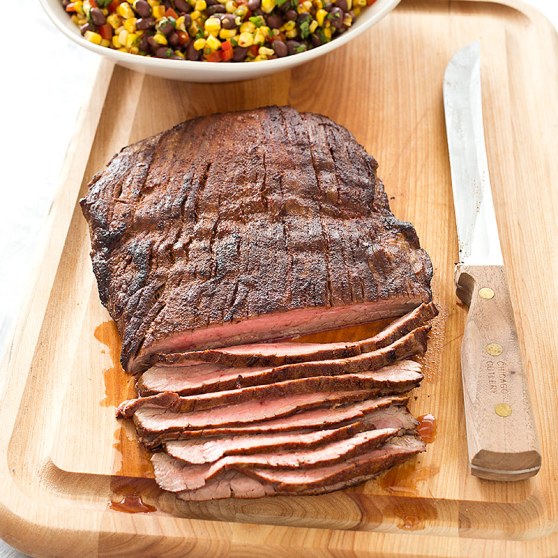
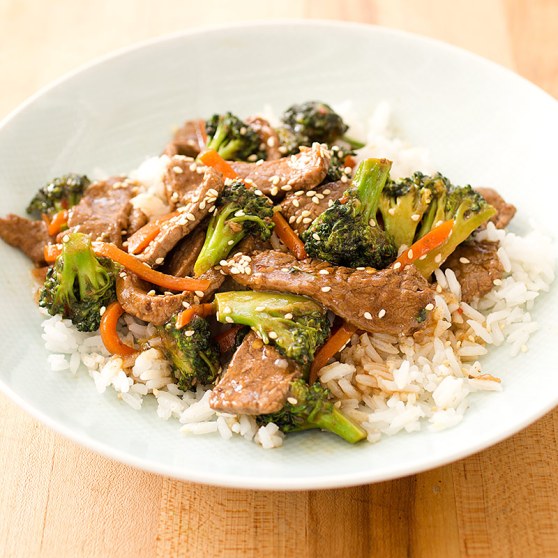
Dinner 1: Beef and Broccoli Stir-Fry

SFS_beef_broccoli_stir_fry-22
SERVES 4 
TO PREP AND COOK 30 MINUTES
Why This Recipe Works: The key to stir-frying is ensuring that the pan is hot enough to sear the meat, deepen the flavors, and evaporate the excess liquid, all in a matter of minutes. We wanted to take advantage of this technique to make a flavorful beef and broccoli stir-fry. Because a stir-fry comes together so quickly, it was critical to get all the ingredients organized ahead of time. Prepping extra broccoli also helped us save time when we made our Skillet Pizza with Broccoli and Red Onion (see below) later in the week. Slicing the steak very thin ensured that it was in and out of the skillet quickly, reducing the risk of overcooking. A simple combination of hoisin sauce, water, and soy sauce flavored with sautéed ginger, garlic, and red pepper flakes gave our stir-fry bold flavor without making our ingredient list too long.
STP_BeefStirFry_SliceThin_02-800
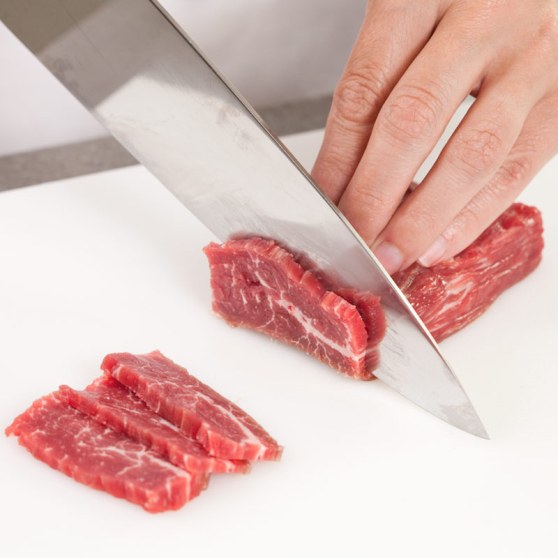
To make slicing the steak easier, freeze it for 20 minutes first. When toasting the sesame seeds in a dry skillet, be sure to shake the pan frequently to prevent them from burning. Serve this dish with white rice.
1/4 cup hoisin sauce
1/2 cup water
2 tablespoons soy sauce
2 tablespoons vegetable oil
1 tablespoon grated fresh ginger
2 garlic cloves, minced
1/2 teaspoon red pepper flakes
1 1/2 pounds flank steak, trimmed and sliced thin across grain
1 pound broccoli florets, cut into 1-inch pieces
2 carrots, peeled and cut into 2-inch-long matchsticks
1/2 red onion, sliced thin
1 tablespoon sesame seeds, toasted

1. Whisk hoisin, 1/4 cup water, and soy sauce together in bowl; set aside. Combine 1 teaspoon oil, ginger, garlic, and pepper flakes in small bowl.
2. Heat 1 1/2 teaspoons oil in 12-inch nonstick skillet over high heat until just smoking. Add half of beef, breaking up any clumps, and cook without stirring for 1 minute. Stir beef and continue to cook until beef is browned around edges, about 30 seconds; transfer to separate bowl. Repeat with 1 1/2 teaspoons oil and remaining beef; transfer to bowl.
3. Heat remaining 2 teaspoons oil in now-empty skillet over high heat until shimmering. Add broccoli, carrots, and onion and cook for 30 seconds. Add remaining 1/4 cup water, cover skillet, and lower heat to medium. Steam vegetables until crisp-tender, about 2 minutes. Push vegetables to sides of skillet. Add ginger-garlic mixture to center of skillet and cook, mashing mixture into skillet, until fragrant, 15 to 20 seconds. Stir mixture into vegetables.
4. Return beef with any accumulated juices to skillet and toss to combine. Whisk sauce to recombine, then add to skillet and cook, stirring constantly, until sauce is thickened and evenly distributed, about 30 seconds. Sprinkle with sesame seeds and serve.
TO GET AHEAD
• Cut remaining 1/2 pound broccoli florets into 1-inch pieces. Refrigerate broccoli in zipper-lock bag for up to 4 days.
• Slice remaining onion thin. Refrigerate onion in zipper-lock bag for up to 4 days. Rinse before using.

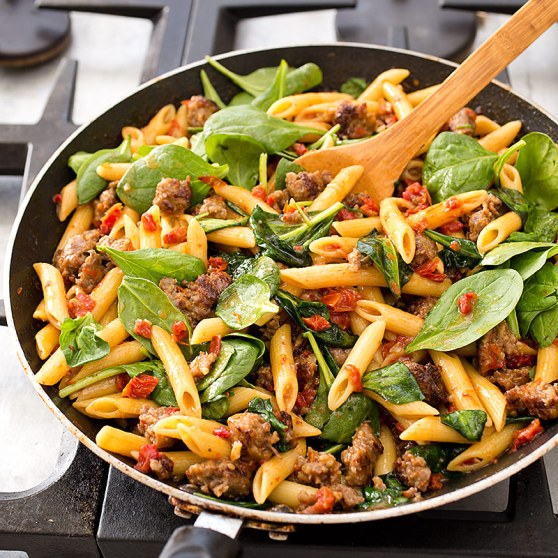
Dinner 2: Skillet Penne with Sausage, Sun-Dried Tomatoes, and Spinach

SFS_skillet_penne_suasage_sundried_tomatoes_spinach-12
SERVES 4 
TO PREP AND COOK 45 MINUTES
Why This Recipe Works: For a fast one-dish pasta dinner, we combined penne with hot Italian sausage and ready-to-cook baby spinach. Chopped sun-dried tomatoes provided big, bold flavor (and also came in handy for a simple yet vibrant sauce for our skillet pizza later in the week). We kept cleanup to a minimum by building the sauce and cooking the pasta right in the skillet. A combination of chicken broth and water provided enough liquid to cook the pasta, and leaving the pan uncovered allowed the sauce to reduce, intensifying its flavor. The starch released from the pasta helped to thicken the sauce. Stirring in the spinach at the end kept its color and flavor bright.
The spinach may seem like a lot at first, but it wilts down substantially. Other pasta shapes can be substituted for the penne; however, their cup measurements may vary.
1 tablespoon extra-virgin olive oil
1 pound hot or sweet Italian sausage, casings removed
3 garlic cloves, minced
2 1/2 cups chicken broth
2 cups water
8 ounces (2 1/2 cups) penne
1/2 cup oil-packed sun-dried tomatoes, rinsed and chopped fine
Salt and pepper
6 ounces (6 cups) baby spinach
Grated Parmesan cheese

1. Heat oil in 12-inch nonstick skillet over medium-high heat until just smoking. Add sausage and cook, breaking up meat with wooden spoon, until no longer pink, about 4 minutes. Stir in garlic and cook until fragrant, about 30 seconds.
2. Stir in broth, water, pasta, tomatoes, and 1/2 teaspoon salt. Bring to vigorous simmer and cook, stirring often, until pasta is tender and sauce has thickened, 15 to 18 minutes.
3. Stir in spinach, 1 handful at a time, and cook until wilted, about 3 minutes. Season with salt and pepper to taste and serve with Parmesan.
TEST KITCHEN TIP: Removing Sausage from Its Casing
Italian sausage is sold in several forms, including links, bulk-style tubes, and patties. If using links, remove the meat from the casing before cooking so that it can be crumbled into small, bite-size pieces. To remove sausage from its casing, hold sausage firmly on one end and squeeze sausage out of opposite end.

Dinner 3: Skillet Pizza with Broccoli and Red Onion

SFS_skillet_pizza_broccoli_red_onion-18
SERVES 4 
TO PREP AND COOK 50 MINUTES
Why This Recipe Works: We wanted to come up with an easier, quicker way to make pizza at home. Our idea was to build the pizza in a skillet, giving the crust a jump start with heat from the stovetop, then transfer it to the oven to cook through—no pizza stone required. The broccoli florets left over from our stir-fry were the perfect choice for a hearty vegetable topping. The bold flavors of red onion and garlic paired well with the mild broccoli, and a quick steam in the microwave gave the veggies a head start, so they were perfectly tender atop the finished pizza. Rather than reach for store-bought pizza sauce, we created a simple yet assertive spread using the sun-dried tomatoes we used in our skillet penne dish. To make the oil-packed sun-dried tomatoes serve double duty, we used their flavorful packing oil both in our spread and in the skillet to brown the crust. To ensure the crispest crusts, we cooked the pizzas over high heat on the stovetop just until the bottoms began to brown, then transferred them to a 500-degree oven to melt the cheese and finish cooking through. A mixture of mozzarella and Parmesan cheeses rounded out our hearty veggie pizzas.
It’s important that the pizza dough be at room temperature so that it will stretch and stay put in the skillet to create an even, crisp crust.
3/4 cup oil-packed sun-dried tomatoes, plus 1/4 cup packing oil
1/2 cup warm tap water
5 garlic cloves, minced
1/4 teaspoon salt
8 ounces broccoli florets, cut into 1-inch pieces
1/2 red onion, sliced thin
1 (1-pound) package store-bought pizza dough
8 ounces mozzarella cheese, shredded (2 cups)
2 ounces Parmesan cheese, grated (1 cup)

1. Adjust oven rack to upper-middle position and heat oven to 500 degrees. Process tomatoes, 2 tablespoons tomato packing oil, 1/4 cup water, one-third of garlic, and salt in food processor until smooth, about 30 seconds, scraping down sides of bowl as needed.
2. Combine broccoli, onion, remaining 1/4 cup water, and remaining garlic in large bowl, cover, and microwave until broccoli is tender, about 2 minutes; drain well.
3. Divide dough in half. Press and roll 1 piece of dough (keep other piece covered) into 11-inch round on lightly floured counter. Grease 12-inch ovensafe skillet with 1 tablespoon tomato packing oil, then lay dough in skillet and reshape as needed. Spread half of tomato mixture on dough, leaving 1/2-inch border at edge, and sprinkle with half each of mozzarella, broccoli-onion mixture, and Parmesan.
4. Set skillet over high heat and cook until edge of crust has set and bottom is spotty brown, about 3 minutes. Transfer skillet to oven and bake pizza until edges are brown and cheese is melted and spotty brown, 7 to 10 minutes. Carefully remove skillet from oven (skillet handle will be hot) and slide pizza onto wire rack. Let cool slightly before serving. Being careful of hot skillet handle, wipe out skillet using paper towels. Let skillet cool slightly, then repeat with remaining 1 tablespoon tomato packing oil, dough, tomato mixture, mozzarella, broccoli-onion mixture, and Parmesan. Serve.